Hello Debugger!
Updated 1 May 2026: Fixed broken links. Updated 2 April 2026: Corrected stale links.
Recap
Here’s a summary of the current state of BoxLambda. We currently have:
- A test build consisting of an Ibex RISCV core, a Wishbone shared bus, internal memory, a timer, two GPIO ports, and a UART core.
- A simple Hello World and LED toggling test program running on the test build.
- An Arty-A7-35T FPGA version of the test build.
- A Verilator version of the test build, for a faster development cycle and automated testing.
- A Linux Makefile and Bender-based build system with lint checking.
Debug Support
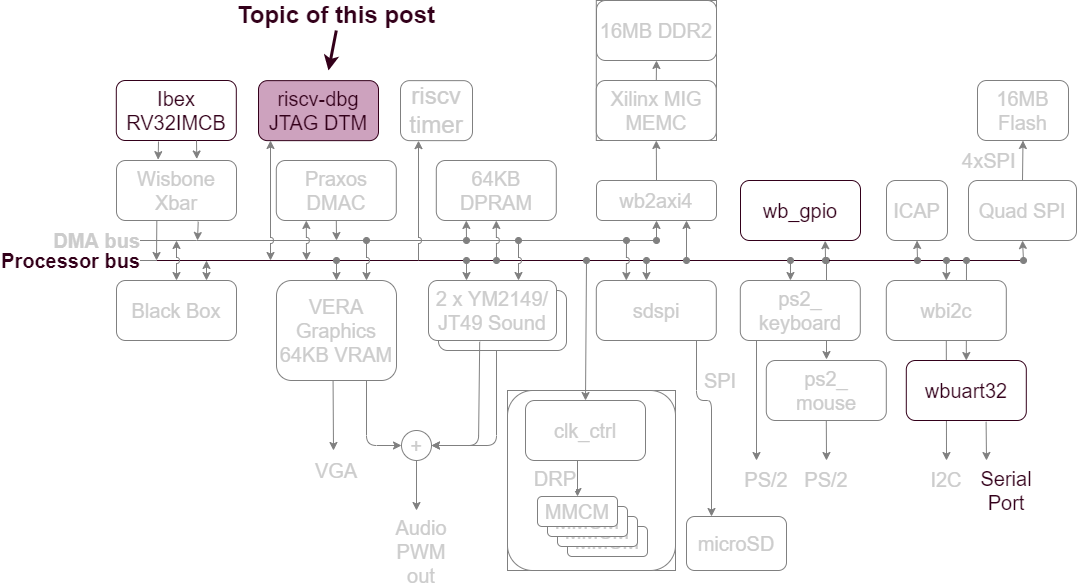
My next step is to bring up a JTAG debug core along with OpenOCD. Having JTAG debug access to the target will come in handy as we bring up more components of the BoxLambda SoC.
OpenOCD is an open-source software package used to interface with a hardware debugger’s JTAG port via one of many transport protocols. In our case, the hardware debug logic is implemented by a component called riscv-dbg. The overall setup looks like this:

OpenOCD General Setup
The target in our case is either a Verilator model or an Arty A7-35T FPGA.
I’m using the RISCV fork of OpenOCD: https://github.com/riscv/riscv-openocd
I created a fork of the riscv-dbg repository for BoxLambda: https://github.com/epsilon537/riscv-dbg
The RISCV-DBG component
First, we need to bring riscv-dbg into the BoxLambda source tree. It took a bit of figuring out which riscv-dbg source files I needed and what their sub-dependencies were. I eventually found all the info I needed in the riscv-dbg testbench makefile.
RISCV-dbg is part of the PULP platform and depends on three additional GitHub repositories that are part of this platform:
- common_cells: https://github.com/pulp-platform/common_cells
- tech_cells_generic: https://github.com/pulp-platform/tech_cells_generic
- pulpino: https://github.com/pulp-platform/pulpino
As their names suggest, common_cells and tech_cells_generic provide commonly used building blocks such as FIFOs, CDC logic, reset logic, etc. Pulpino is an entire RISCV-based SoC project. However, the riscv-dbg pulpino dependency is limited to just a few cells for clock management.
I created git submodules for all of these repositories under the BoxLambda repository’s sub/ directory. I then created a riscv-dbg component directory with a Bender.yml manifest in it, referencing all the sources needed from those submodules: components/riscv-dbg/Bender.yml.
boxlambda
├── components
│   └── riscv-dbg
│       └── Bender.yml
└── sub
    ├── common_cells
    ├── tech_cells_generic
    ├── pulpino
    └── riscv-dbg
RTL Structure
RISCV-DBG has two top-levels:
Recall that BoxLambda uses a Wishbone interconnect. The Ibex_WB submodule implements a Wishbone wrapper for the Ibex RISCV core. It does the same for RISCV-DBG’s dm_top: sub/ibex_wb/rtl/wb_dm_top.sv
Refer to the ibex_soc example to see how RISCV-DBG is instantiated: sub/ibex_wb/soc/fpga/arty-a7-35/rtl/ibex_soc.sv
OpenOCD and RISCV-DBG Bring-Up on Verilator
The riscv-dbg testbench makefile shows how to test OpenOCD JTAG debugging on a Verilator model. The JTAG transport protocol is a simple socket-based protocol called Remote Bitbang. The remote bitbang spec is just one page:
https://github.com/openocd-org/openocd/blob/master/doc/manual/jtag/drivers/remote_bitbang.txt
The Verilator setup looks like this:
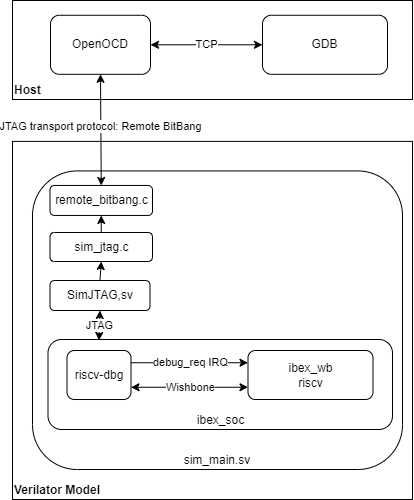
BoxLambda OpenOCD Verilator Setup
Surprisingly, the original riscv-dbg remote bitbang code that gets compiled into the Verilator model does not implement the spec correctly. I implemented a fix and filed a Pull Request:
https://github.com/pulp-platform/riscv-dbg/pull/133
With that fix in place, I can build and run a Verilator model, connect OpenOCD to the model, and connect GDB to OpenOCD:
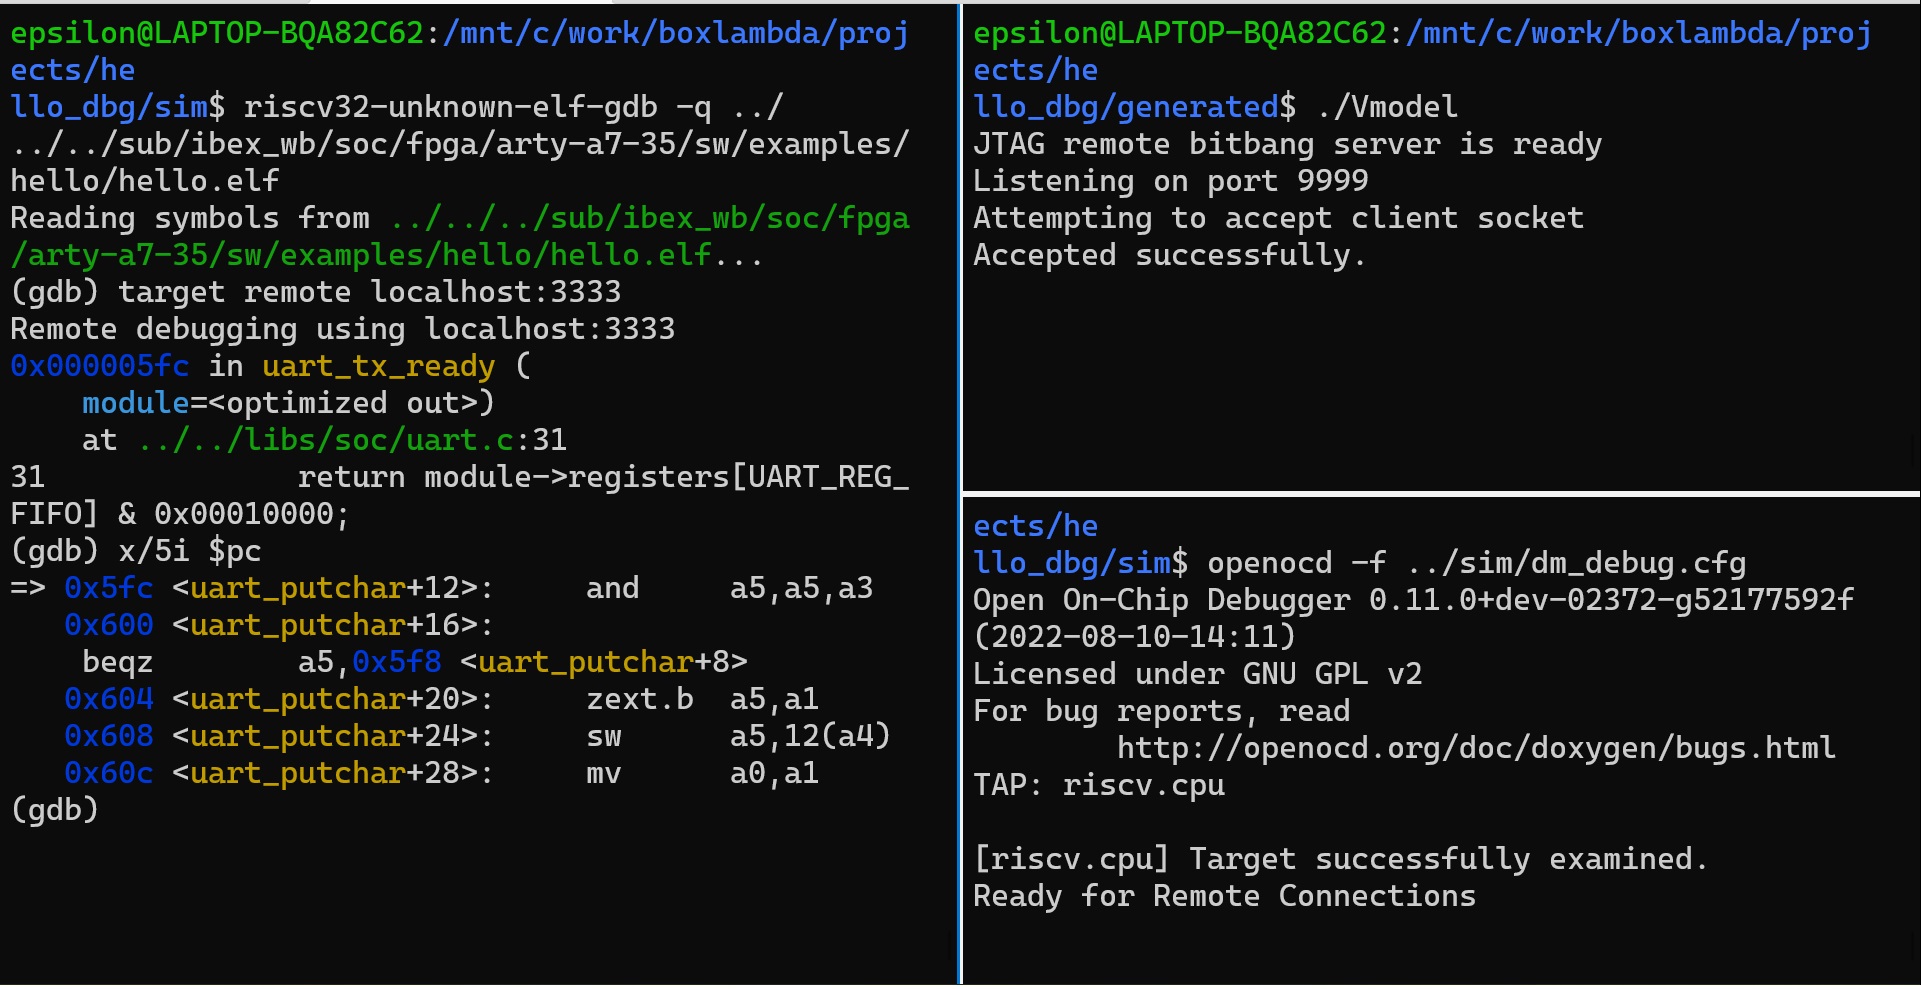 OpenOCD JTAG Debug Session on Verilator
The Try It Out section below shows the steps needed to recreate this OpenOCD JTAG debug session on Verilator.
The OpenOCD configuration file for JTAG Debugging on Verilator is checked into the openocd directory: openocd/verilator_riscv_dbg.cfg
To summarize:
- The above OpenOCD config file is used to connect to the JTAG TAP of a Verilator model.
- The JTAG TAP is implemented by a RISCV-DBG core connected to an Ibex RISCV32 core.
- The JTAG TAP is used to debug the software running on the Ibex RISCV32 core.
- The JTAG TAP is accessed using a socket-based OpenOCD transport protocol called remote_bitbang.
The Hello_DBG Project and Automated Test
The hello_dbg project (directory projects/hello_dbg/) implements the OpenOCD Verilator setup shown above. The project contains the Hello World test build extended with the riscv-dbg component. The project directory also contains a test script that goes through the following steps:
- Start the Verilator model
- Connect OpenOCD to the model
- Connect GDB to OpenOCD (and thus to the model)
- Execute a UART register dump on the target
- Check the UART register contents against expected results.
boxlambda
├── projects
│   └── hello-dbg
│       ├── Bender.yml
│       ├── sim
│       │   ├── sim_main.cpp
│       │   └── sim_main.sv
│       └── test
│           ├── test.sh
│           └── test.gdb
├── components
│   └── riscv-dbg
└── sub
    ├── common_cells
    ├── tech_cells_generic
    ├── pulpino
    └── riscv-dbg
OpenOCD and RISCV-DBG bring-up on Arty-A7 FPGA
With the Verilator setup up and running, I had enough confidence in the system to try out OpenOCD JTAG debug access on FPGA.
The obvious approach would be to bring out the JTAG signals to PMOD pins and hook up a JTAG adapter. However, there’s an alternative method that doesn’t require a JTAG adapter. The riscv-dbg JTAG TAP can be hooked into the FPGA scan chain which is normally used to program the bitstream into the FPGA. On the Arty-A7, bitstream programming is done using the FTDI USB serial port, so no special adapters are needed.
The riscv-dbg codebase lets you easily switch between a variant with external JTAG pins and a variant that hooks into the FPGA scan chain, by changing a single file:
- dmi_jtag_tap.sv: hooks up the JTAG TAP to external pins
- dmi_bscane_tap.sv: hooks the JTAG TAP into the FPGA scan chain. The Xilinx primitive used to hook into the scan chain do this is called BSCANE. Hence the name.
Both files implement the same module name (dmi_jtag_tap) and the same module ports, so you can swap one for the other without further impact on the system. Lightweight polymorphism.
On the OpenOCD side, the transport protocol for this Debug-Access-via-FPGA-scan-chain-over-FTDI is anti-climactically called ftdi.
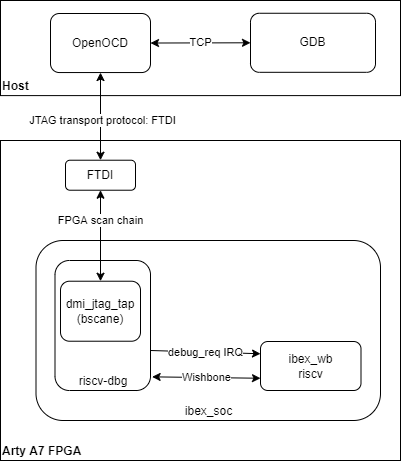
BoxLambda OpenOCD Arty A7 FTDI Setup
OpenOCD Configuration for the Arty A7 FTDI Setup
So far so good. However, it wasn’t obvious to me what OpenOCD configuration settings I should be using. The OpenOCD documentation recommends creating new configurations starting from existing, similar configurations. Other than that, the documentation appears to be more concerned about properly organizing the configuration into an interface, board, and target section than it is about providing detailed info about how you should go about setting up a specific JTAG configuration.
Still, the given advice worked out. I found the OpenOCD config files for two other Arty A7-based projects online:
- Saxon SoC: https://github.com/SpinalHDL/SaxonSoc/blob/dev-0.3/bsp/digilent/ArtyA7SmpLinux/openocd/usb_connect.cfg
- Shakti SoC: https://gitlab.com/shaktiproject/cores/shakti-soc/-/blob/master/fpga/boards/artya7-100t/c-class/shakti-arty.cfg
From those two config files, and some table data provided in the riscv-dbg documentation, I pieced together a config file that works. I checked in the file under openocd/digilent_arty_a7.cfg.
To summarize:
- The above OpenOCD config file is used to connect to the JTAG TAP of a riscv-dbg core…
- …to debug the software running on a connected Ibex RISCV32 core.
- The RISCV-DBG core’s JTAG TAP is hooked into the Arty-A7’s scan chain, normally used for loading a bitstream into the FPGA.
- The Arty-A7 FPGA scan chain is accessible through the board’s FTDI-based USB serial port.
- The OpenOCD transport protocol name for this type of connection is ftdi.
The Try It Out section below lists the steps needed to set up an OpenOCD JTAG debug session on the Arty A7.
Summary of Changes
New SubModules
- sub/common_cells: Support code for riscv-dbg
- sub/pulpino: Support code for riscv-dbg
- sub/tech_cells_generic: Support code for riscv-dbg
- sub/riscv-dbg: RISCV32 JTAG Debug Core
New Components and Projects
- components/riscv-dbg: BoxLambda build system riscv-dbg component, referencing the appropriate files from the above submodules.
- projects/hello-dbg: A test build containing the riscv-dbg component along with all the components from the Hello World test build. Includes automated test verifying OpenOCD JTAG Debug access to the RISCV core.
OpenOCD Configuration Files
- openocd/digilent_arty_a7.cfg: OpenOCD configuration for JTAG Debugging on Arty A7.
- openocd/verilator_riscv_dbg.cfg: OpenOCD configuration for JTAG Debugging on Verilator.
Build System Changes
- I added a TOP_MODULE variable to the makefiles. TOP_MODULE identifies the top RTL module of that particular build. This info is passed on to both Verilator and the Vivado synthesizer. Specifying the top module in a design avoids ambiguity and associated build warnings/errors.
- I removed Bender vlt targets. Vlt files can now be listed under the verilator target file list.
- I removed Bender sim targets. Simulation cpp files can now be listed under the verilator target file list.
New Prerequisites
- Build RISCV OpenOCD from source:
git clone https://github.com/riscv/riscv-openocdcd riscv-openocdgit submodule update --init --recursive./bootstrap./configure --prefix=$RISCV --disable-werror --disable-wextra --enable-remote-bitbang --enable-ftdimakesudo make install- Add the install directory (/usr/local/bin in my case) to your PATH.
- riscv32-unknown-elf-gdb, which is installed as part of the riscv32 toolchain, has a dependency on libncursesw5. You might not have that library on your system yet. Install it as follows:
sudo apt install -y libncursesw5
Try It Out
Repository setup
- Install the Prerequisites.
- Get the BoxLambda repository:
git clone https://github.com/epsilon537/boxlambda/ cd boxlambda - Switch to the hello_dbg tag:
git checkout hello_dbg - Get the submodules:
git submodule update --init --recursive
Connecting GDB to the Ibex RISCV32 processor on Arty A7
- Build the test project:
cd projects/hello_dbg make impl - Start Vivado and download the generated bitstream to your Arty A7-35T: projects/hello_dbg/generated/project.runs/impl_1/ibex_soc.bit
- Verify that the Hello World test program is running: The four LEDs on the Arty A7 should be blinking simultaneously.
- If you’re running on WSL, check the When on WSL note below.
- Start OpenOCD with the digilent_arty_a7.cfg config file:
sudo openocd -f <boxlambda root directory>/openocd/digilent_arty_a7.cfg Info : clock speed 1000 kHz Info : JTAG tap: riscv.cpu tap/device found: 0x0362d093 (mfg: 0x049 (Xilinx), part: 0x362d, ver: 0x0) Info : [riscv.cpu] datacount=2 progbufsize=8 Info : Examined RISC-V core; found 1 harts Info : hart 0: XLEN=32, misa=0x40101106 [riscv.cpu] Target successfully examined. Info : starting gdb server for riscv.cpu on 3333 Info : Listening on port 3333 for gdb connections Ready for Remote Connections Info : Listening on port 6666 for tcl connections Info : Listening on port 4444 for telnet connections - Launch GDB with hello.elf:
cd <boxlambda root directory>/sub/ibex_wb/soc/fpga/arty-a7-35/sw/examples/hello riscv32-unknown-elf-gdb hello.elf - Connect GDB to the target. From the GDB shell:
(gdb) target remote localhost:3333
Remote debugging using localhost:3333
0x00000c90 in delay_loop_ibex (loops=3125000) at ../../libs/soc/utils.c:12
12              asm volatile(
When on WSL
If you’re running on WSL, you need to make sure that the USB port connected to the Arty A7 is forwarded to WSL. The following article describes how to do this:
https://docs.microsoft.com/en-us/windows/wsl/connect-usb
On my machine, these are the steps:
-
From a Windows Command Shell:
C:\Users\ruben>usbipd wsl list BUSID VID:PID DEVICE STATE 1-2 0403:6010 USB Serial Converter A, USB Serial Converter B Not attached 1-3 0461:4d15 USB Input Device Not attached 1-7 13d3:5666 USB2.0 HD UVC WebCam Not attached 1-14 8087:0aaa Intel(R) Wireless Bluetooth(R) Not attached C:\Users\ruben>usbipd wsl attach --busid 1-2 -
From a Linux shell on WSL:
 epsilon@LAPTOP-BQA82C62:~$ lsusb
 Bus 002 Device 001: ID 1d6b:0003 Linux Foundation 3.0 root hub
 Bus 001 Device 002: ID 0403:6010 Future Technology Devices International, Ltd FT2232C/D/H Dual UART/FIFO IC
 Bus 001 Device 001: ID 1d6b:0002 Linux Foundation 2.0 root hub
Connecting GDB to the Ibex RISCV32 processor on Verilator
-
Build the test project:
cd projects/hello_dbg make sim -
Launch the Verilator model:
cd generated ./Vmodel -
Start OpenOCD with the verilator_riscv_dbg.cfg config file:
openocd -f <boxlambda root directory>/openocd/verilator_riscv_dbg.cfg Open On-Chip Debugger 0.11.0+dev-02372-g52177592f (2022-08-10-14:11) Licensed under GNU GPL v2 For bug reports, read http://openocd.org/doc/doxygen/bugs.html TAP: riscv.cpu [riscv.cpu] Target successfully examined. Ready for Remote Connections on port 3333. -
Launch GDB with hello.elf:
cd <boxlambda root directory>/sub/ibex_wb/soc/fpga/arty-a7-35/sw/examples/hello riscv32-unknown-elf-gdb hello.elf -
Connect GDB to the target. From the GDB shell:
 (gdb) target remote localhost:3333
 Remote debugging using localhost:3333
 0x000005fc in uart_tx_ready (module=<optimized out>) at ../../libs/soc/uart.c:31
 31              return module->registers[UART_REG_FIFO] & 0x00010000;
Running the Hello_DBG Automated Test
In the hello_dbg project directory, run make test:
epsilon@LAPTOP-BQA82C62:/mnt/c/work/boxlambda/projects/hello_dbg$ make test
make -C /mnt/c/work/boxlambda/projects/hello_dbg/../../sub/ibex_wb/soc/fpga/arty-a7-35/sw/examples/hello
...
make[1]: Leaving directory '/mnt/c/work/boxlambda/projects/hello_dbg/generated'
cd generated && source ../sim/test.sh
JTAG remote bitbang server is ready
Listening on port 9999
Attempting to accept client socket
Open On-Chip Debugger 0.11.0+dev-02372-g52177592f (2022-08-10-14:11)
Licensed under GNU GPL v2
For bug reports, read
        http://openocd.org/doc/doxygen/bugs.html
TAP: riscv.cpu

Accepted successfully.[riscv.cpu] Target successfully examined.
Ready for Remote Connections on port 3333.
$1 = 0x10010000
Test Passed.
Interesting Links
- OpenOCD JTAG Primer: Say JTAG to a software engineer and he’ll think Debug. Say JTAG to a hardware engineer and he’ll think Boundary Scan. This primer clears up the confusion.
- https://github.com/epsilon537/riscv-dbg/blob/boxlambda/doc/debug-system.md: The riscv-dbg debug system documentation.